MEASUREMENTS AND ERRORS IN MEASUREMENT
In physics we seek to provide an orderly and precise description of natural phenomena through the use of numbers. In the report of an experiment, the use of numbers instead of qualitative descriptions is always preferred. For example, suppose we try to learn about the amount of friction between the wheels of a toy car and the floor by repeatedly pushing the car and observing what happens. We could report the result of the experiment by saying "the car traveled about half of the width of the room before stopping." But we could give a much more precise result by saying "the car traveled 6.23 meters before stopping."
More is involved in reporting the result of an experiment than a simple statement of the experimental number. To state that d = 6.23 meters leaves the unanswered question, "How precise is the result?" Could the distance be 6.28 meters or 6.19 meters? No experimental result is ever perfectly precise. In the experiment with the toy car several different distances were probably obtained and the quoted value is an average. However, even if the same number had been obtained every time there are uncertainties in the result due to the measuring instrument itself. It is this type of uncertainty that we want to concentrate on today.
An experimenter will usually state the result of a measurement as
d = (6.234 ± 0.003) meters.
The first number (6.234) is called the most probable or average value. The second number (0.003) is called the absolute error or absolute uncertainty. The error is "absolute" in the sense that it is stated in the same physical units as the measured quantity. The experimenter means by this statement that the value of d lies somewhere between 6.237 and 6.231, and that the most probable value of d is 6.234. The word error used in this sense does not mean mistake. It is a statement of the precision of the measurement. In considering whether two measurements are equal (for instance, if trying to decide whether two cars have the same speed) we must consider the ranges as well as the most probably value. Two measurements are said to be equal to within the precision of the measurement if the ranges overlap.
Sometimes relative or percent error is given rather than absolute error. The relative error in d is the fraction of d represented by the absolute error. If a measurement of d is given in the form of d + D d, then the relative error in d is Dd/d. Of course, percent error is just the relative error expressed as a percent rather than a fraction. The smaller the relative error, the more precise is the measurement. But a smaller absolute error does not necessarily mean an improvement in the precision. For example, the result L = 602.4 + 0.03 meters has a larger absolute error than the value given for d above, but a smaller relative error.
| absolute error in d = 0.003 m | relative error in d = .003/6.234 = 4.8 x 10⁻⁴ |
| absolute error in L = 0.03 m | relative error in L = 0.03/6.024 = 5.0 x 10⁻⁵ |
Making Measurements
The first laboratory skill to be learned is that of making accurate measurements and estimating the precision of your measurements. Later in the lab you will learn how to perform calculations with measured quantities so that the precision of the calculated result is the same as the precision of the measured values. Today you will make measurements with a variety of measuring instruments. Stations will be set up around the room. At each station you will make the measurement, write your value on a slip of paper along with your initials, then fold your slip of paper and put it in the cup. Do not compare your answers with those of other students. Each station is listed below. Following the list, hints for accurate measurement with some of the instruments are given below the list. In all cases, do your best to estimate between the marked lines.
Stations A: Measure the height of the lab table using a meter stick.
Station B: Measure the width of the lab table using a meter stick.
Station C: Measure the height of the block using a meter stick.
Station D: Measure the width of the block using a meter stick.
Station E: Measure the length of the block using a meter stick.
Station F: Measure the height of the block using a vernier caliper.
Station G: Measure the width of the block using a vernier caliper.
Station H: Measure the length of the block using a vernier caliper.
Station I: Measure the mass of the block using a triple beam balance.
Station J: Measure the temperature of the room using a thermometer.
Station K: Measure the volume of water in the beaker.
Station L: Measure the volume of water in the large graduated cylinder.
Station M: Measure the volume of water in the small graduated cylinder
Station N: Measure the weight of the object using a spring scale.
Station O: Measure the weight of the object using a spring scale
Station P: Measure the voltage of the battery using the volt meter.
Station Q: Measure the current in the light bulb using the digital ammeter.
Meter stick: In making measurements of length with a meter stick, the meter stick should be placed on its edge so that the marks are adjacent to the object being measured. Usually it is better not to use the ends of the meter stick because they become worn with use. However, in cases where it is difficult to determine the exact edge of the object being measured, it may be helpful to hold a rectangular block firmly against the edge and then place the end of the meter stick against it. Measurements made using a meter stick are usually to the nearest millimeter.
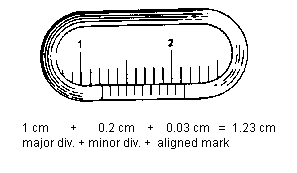
Vernier Caliper: Using the vernier caliper we can make measurements to the nearest tenths of a millimeter (hundredths of a centimeter). A vernier caliper has two scales, one fixed scale and one sliding or vernier scale. To use the caliper, separate the jaws, place the object to be measured between them, and close the jaws firmly on the object. Suppose the vernier scale occupies the position shown in the figure.

The zero of the vernier scale shows that the jaws are separated by more than 1.2 cm and less than 1.3 cm. Centimeters and tenths of a centimeter are read on the fixed scale. Hundreds of centimeters are read from the vernier scale by locating the particular division on the vernier scale which coincides with a division of the fixed scale. There is only one. In the figure it is mark number 3. Therefore, the correct reading is 1.23 cm.
Triple Beam Balance: The device which you will use to make mass measurements this semester is called a triple beam balance. You should always check to see that the pointer is centered when the pan is empty and all three sliding weights are fully to the left. If not, turn the adjustment screw (located under the pan) until it is balanced. To determine the mass of an object, place the object on the pan and adjust the sliding weights (beginning with the largest) until balance is achieved. The unit of mass is the gram.
Graduated Cylinder: When reading a graduated cylinder, you will notice that the surface of the liquid is not flat. It is lowest in the center and curves up at the edges. You should read the location of the lowest point.
Thermometer: Be very careful not to drop the thermometer. Do not hold the thermometer by the bulb end as that will change the reading.
Volt and current meters: We will learn more about voltage and current next semester. For now just close the switch and read the measurement off the scale without changing anything on the meter. When you are done, open the switch.
Finding Averages and Errors:
Each person will be assigned to average the values from one of the stations. Copy all the values from that station into your notebook. The average of all the values gives you the most probable value of the measurement. Now determine which measurement is farthest from the average. The difference between this measurement and the average is taken to be the absolute error. If all your measurements happened to turn out to be the same, then the absolute error is taken to be half the distance between the smallest marks on the scale. Calculate the percent error for your measurements. Record your most probable value, absolute error and percent error in the chart on the board. When the chart is complete, copy it into your lab notebook. Answer the following questions in your notebook. In each case explain what evidence you used in answering the question.
Volume
Now, you need to calculate the volume of the block. However, first you must learn how to handle the errors. First, just calculate the volume of the block using the most probable values. Remember that 3.2 ± .1 cm means that the measurement lies somewhere between a minimum of 3.1 and a maximum of 3.3. Calculate the volume using the minimum value for each dimension. Repeat using the maximum value for each dimension. Using these results, express the volume as a most probable value ± absolute error. Then calculate the percent error for the volume.
This procedure is tedious and luckily it is not necessary to do it every time. Essentially the same result can be obtained by adding the percent errors of the numbers you are multiplying together. For instance, say you want to find the area of a table top, you have measured the length to be 4.2 ft. + 3% and the width to be 2.0 ft. + 4%. Then the area is 8.4 ft.2 + 7%. Note the errors must be stated as percent error not absolute error. Usually after performing the calculation you will want to go back to absolute error in the final answer. In the above example, 7% of 8.4 is 0.6 so the area was found to be 8.4 ft.2 + 0.6 ft.2 . Calculate the error in your volume using this method. Is it roughly the same as you got doing it the tedious way?
Density
The density of an object is defined as the mass of the object divided by its volume. Now you need to learn how to handle errors in a division process. First calculate the density using the most probable values of the mass and volume. The smallest possible value of the density will be obtained by dividing the minimum mass by the maximum volume. The largest possible value will be obtained by dividing the maximum mass by the minimum. State the density as most probable value + absolute error, then calculate the percent error.
As with multiplication, there is an easier method for handling errors. When dividing measurements with errors, the relative (or percent) errors add just as in multiplication. Calculate the percent error in your density this way. Is it roughly the same as you got doing it the long way?
Last Modified Aug, 2013