QUANTITATIVE ELECTROSTATICS
INTRODUCTION
Charge is a fundamental property of matter. The effects of charge are not always
apparent. In this
experiment, you will observe charge separation and transfer and learn how to
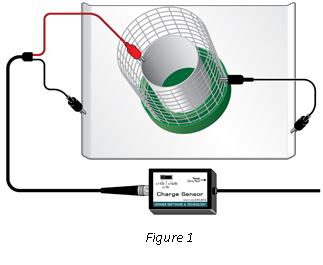
measure the electric charge of objects by the use a Charge Sensor Probe and a Faraday Pail to measure electric charge.
In this investigation you will:
- Observe and quantify the separation of electrical charge by friction.
- Observe and quantify charging by contact.
- Observe and quantify charging by induction.
PREPARATION: SETTING UP THE EXPERIMENT
Either perform or verify the following steps before continuing on to the actual
experimental tasks.
- Place the plastic disk that holds the Faraday pail and cage on the grounding
plane.
- Add the slotted mass to the Faraday pail. Place the Faraday pail and the cage on the disc.
- Connect the black lead from the charge sensor to the grounding plane.
- Connect the red lead from the charge sensor to the Faraday pail.
- Connect the charge sensor to the data-collection interface and set the range
switch to the +/- 10 V position.
- Connect a grounding wire between the cage and the grounding plane.
- This equipment is capable of measuring very small amounts of charge. As you
proceed with the experiment, your equipment may accidentally or intentionally
develop a charge. It will be important to remove or ground unwanted charge
either in the Faraday pail or on the sensor. This is accomplished by pressing
and holding the Reset button on the sensor.
- You are now ready to measure the charge of objects that are inserted into the
center of the Faraday pail.
|
 |
PART 1: THE STATIC ELECTRICAL CHARGE ON YOUR BODY
This part of the experiment demonstrates the quantity of charge that can reside
on your body and how you can minimize the effects of this build-up of charge in
subsequent experiments.
This part is semi-quantitative. You will be concerned with the relative
size and sign of your observations but not so much the exact number you observe.
You should perform Part 1 and complete your reflection and discuss your findings
with your group members before proceeding with the
rest of the experiments.
- Set up the Faraday pail and charge sensor as shown in Figure 1 (if
not already performed).
- Scuff your shoes on the floor. Insert a finger into the pail without touching the pail or cage.
Observe the readings on the meter.
- Remove your finger. Again, observe the readings on the meter. Record your
findings.
- Touch the metal grounding plane that holds the Faraday pail with your finger.
- Insert your finger into the pail without touching the pail. Observe the
reading on the meter. Remove your finger. Again, observe the reading on the
meter. Account for your observations.
- If possible, repeat Steps 2 and 3 using a different combination of shoe type
or flooring (perhaps your lab partner has a different type of shoe or a piece of
carpet is available). Be sure to record what has changed - shoe, person,
type of floor, etc.
- Ground the pail and zero the sensor by pressing and holding the Reset button
on the sensor.
- Attach the alligator clip on the grounding strap to the grounding plane and
attach the grounding strap to the wrist of your dominant hand.
- Repeat Steps 2 and 3. (Note: The only difference is this time you will use the grounding strap.)
Make a record of your observations in your lab notebook.
|
Now that you have some experience with charge, take a few moments to reflect on
what you have observed by completing the following:
- Describe the reading of the charge sensor when you placed your
finger in the Faraday pail and then removed it.
- Describe your findings in terms of the transfer of
charged particles between you and the floor and the movement of these particles
in the pail.
- How did the readings you observed change after you touched the
grounding plane?
- Explain the effect of the grounding strap - i.e. how did your
observations change when you used the grounding strap?
PARTS 2–4 QUANTITATIVE STUDY OF THE SEPARATION AND MOVEMENT OF CHARGE
For the remainder of this experiment you will collect
charge data as a function of time. During your analysis you will identify events
on the graph (e.g., when an object is inserted into or removed from the pail)
using features in the software called Data Marks and Data Tags. Data
Marks and Data Tags are both ways to add a note to a particular moment in data
collection. Later you can add notes to each Mark or Tag. Marks are added during
the data collection process while Data Tags are
added after the collection is complete.
| Marking Data in Logger Pro |
- To add a Data Mark while collecting data in Logger Pro, press the “D” key
on the keyboard for each point of interest. Each time an event is marked, a Data
Mark helper object will be displayed on the graph. The time and associated
sensor value are recorded; later, you can add notes to that event by
double-clicking a Data Mark helper object and entering a description of the
event.
- If you wish to add additional tags after you have stopped data collection, you
may insert a Data Tag. Turn on the Examine tool. Click the point on the graph
you wish to tag and choose Tag Data from the Experiment menu and a Data Tag
helper object will appear.
|
Part 2 Charge separation due to friction
In Part 1, you explored the charge that accumulated on your body, but you did
not explore the charge that might be on the floor or carpet. If you were able to
measure the charge on the floor, what would you expect to observe? In this part
of the experiment, you will use small dissimilar materials to explore the charge
on each of them after they are rubbed together.
- Choose New from the File menu. If necessary, change the data-collection duration to 60
seconds and the data-collection rate to 10 readings per second.
- Attach the alligator clip on the grounding strap to the grounding plane, and
then attach the grounding strap to your wrist. Ground the system and discharge
the charge sensor by pressing and holding the Reset button on the sensor.
- To remove any charge from the charge separators, dab each charge separator on
a damp cotton cloth. Do not rub the charge separator and cotton cloth together,
as this might result in a build-up of charge on the disc. Insert the charge
separators into the Faraday pail one at a time to verify that they are
electrically neutral.
- Rub the white and gray charge separators together, then hold them separately.
- In the next step, mark each time you insert or remove the charge separator.
- Start data collection; be ready to mark events.
- Insert the white charge
separator into the middle of the pail without touching the pail.
- Wait 4 or 5
seconds, then remove it.
- Wait a couple of seconds, then insert the gray charge
separator into the middle of the pail and wait 4 or 5 seconds.
- Remove it and
wait a couple of seconds.
- Finally, position both charge separators in the pail;
be careful to keep the charge separators from touching the pail or each other.
- Wait 4 or 5 seconds, then remove both separators and stop data collection.
- Label the marked events for each of the charge separators. Sketch or print
the graph.
- Store this run.
|
In analyzing your data it is helpful for you to view the graph of charge vs.
time for only one run at a time. To do this in Logger Pro, click the vertical
axis label, choose More, and select Charge for the run you wish to view. Analyze
your plot for the charge separators and address the following:
- Record the sign of the charge on each charge separator. Compare the
magnitude of the charge on each of the separators.
- Account for the shape of your data graph in terms
of the transfer of charged particles between the charge separators. Account for
the features of the graph when each of the charge separators was in the pail
separately and when they were in the pail together.
Part 3 Charging by contact
In Parts 1 and 2, you inserted and removed a charged object in the Faraday pail.
What do you expect would happen if you touched the pail with the charged object?
The following investigation will allow you to determine the outcome.
- Continue use of the grounding strap as you did in Part 2. Ground the system
and discharge the charge sensor by pressing and holding the Reset button on the
sensor.
- To remove any charge from the charge separators, dab each charge separator on
a damp cotton cloth. Insert the charge separators one at a time into the Faraday
pail to verify that they are electrically neutral.
- Rub the charge separators together, then set one aside.
- Start data collection; be ready to mark events.
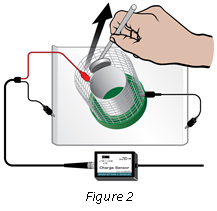
- Insert one of the charge
separators into the middle of the pail without touching the pail (see Figure 2).
- Wait 4 or 5 seconds, then remove it.
- Wait a couple of seconds.
- Now lightly rub
the charge separator across the top edge of the pail and remove it from the
pail.
- Stop data collection.
- Label the marked events. Sketch or print the graph.
- Store the run.
|
 |
Your data plot should be similar to what you observed in Part 2 for
early times but different for later times. Reflect upon the following:
- Account for the shape of the graph in each of these regions in terms of the
transfer of charged particles between the separator and the pail.
- Did the charge in the pail return to zero at the end of the experiment?
Give an explanation of why or why not.
Part 4 Charging by induction
In Part 1, you found that touching the grounding plane “removed” excess charge
from your finger. Suppose the pail were grounded with a conducting wire when a
charged body was brought close to it. What effect would this have on the charge
of the pail? In this part, you will take a closer look at the effect of
“grounding” in this situation.
- Continue use of the grounding strap as you did in Part 2. Ground the system
and discharge the charge sensor by pressing and holding the Reset button on the
sensor.
- Attach a second grounding wire to the grounding plane, leaving the other end
disconnected. You’ll use this later to ground the pail.
- As you did in Part 3, make sure that the charge separators are electrically
neutral.
- Rub the charge separators together. When you collect data, use the same
separator as you did in Part 3 and set the other one aside.
- Start data collection; be ready to mark events. (be sure to add a
Data Mark)
- Insert the charge separator
into the middle of the pail (be careful to not touch the side of the pail).
- Wait
4 or 5 seconds, then remove it.
- Wait another couple of seconds.
- Reinsert the
charge separator into the pail.
- Wait a few seconds then ground the pail by briefly touching it with
the second grounding wire.
- Wait 4 or 5 seconds, then remove the charge
separator.
- Wait a couple of seconds and move the charge separator back into the
pail.
- Wait 4 or 5 seconds, then remove the charge separator and stop data
collection.
- Save your data file.
- Label the marked events. Sketch or print the graph.
|
Consider the shape of the graph in each of these regions in terms of the
transfer of charged particles between the pail and grounding plane and the role
of the charge separator.
- Did the net charge in the pail return to zero at the end of the experiment?
Why or why not?
- If charge remained, was it the same polarity as the separator?
- What was the (approximate) measured charge at the end of step e)?
At the wait in step h)?
- What is the approximate ratio of the charge after the wait in step
b) compared to the charge after the wait in step g)?
- If the ratio is a negative number, where did the opposite charge
come from?
Now that you have made several investigations, reflect on each of the parts and
give your understanding of how objects become charged, are neutralized, and how
charge is transferred.